.svg)


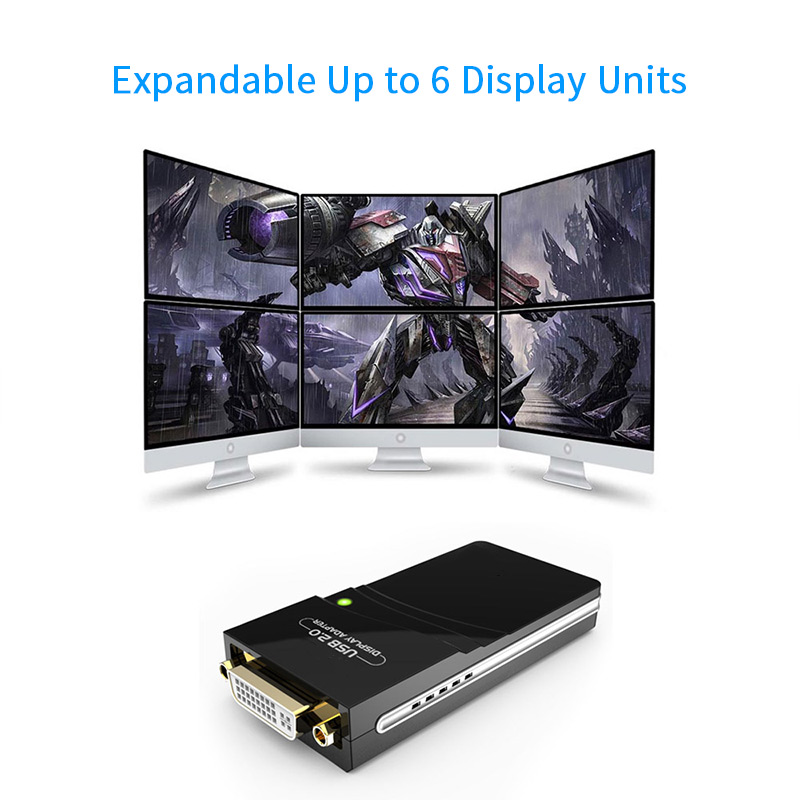

The adapter for multiple displays with mode extend. Just grab and go, the perfect travel companion and essential accessory for your trip around the world. Plug and play, maximum convenience.
WS-UG17D1
If you own an SMA8, you need the manual specific to your serial number era.
Since you likely can’t find the original pamphlet, here is the community-sourced checklist for building in the SMA8.
The SMA8 was designed for massive cooling. The top and bottom chambers accept "Flex-Bays."
The Caselabs SMA8 manual is more than a set of assembly instructions. It is a piece of PC history. Without it, a complex chassis becomes an intimidating pile of black anodized aluminum.
Final Checklist for Current Owners:
If you are buying a used SMA8, do not complete the transaction unless the seller provides photos of the manual or a digital copy. Without it, you are buying a $1,000 puzzle box.
Have a specific SMA8 question not covered here? Visit the CaseLabs Legacy subreddit. The community has kept this titan of a case alive through sheer passion and shared documentation.
Since CaseLabs officially closed its original operations in 2018 (before being revived by new ownership), finding a physical or official PDF manual for the Magnum SMA8
can be a challenge. Most enthusiasts relied on community build logs and the original assembly videos.
Below is a comprehensive, instructional guide drafted to serve as a functional manual for the CaseLabs Magnum SMA8 1. Introduction to the Magnum SMA8 CaseLabs Magnum SMA8
is a premium, all-aluminum full-tower chassis designed for extreme water cooling and modularity. Unlike mass-produced cases, the
arrives as a "flat-pack" or partially assembled kit, utilizing a Flex-Bay system that allows you to customize the front I/O and drive configurations. 2. Pre-Assembly Checklist Before starting your build, ensure you have the following:
: A Philips #1 and #2 screwdriver (magnetic preferred) and a hex key set (if using specialized mods).
: Ensure you have the bags of 6-32 screws (for the frame and hard drives) and M3 screws (for SSDs and ODDs).
: You will need a large, non-scratch surface (like a silicone mat or towel) as the aluminum panels are prone to scratching before the build is rigid. 3. Frame Assembly & Core Structure uses a "box-frame" design. If your unit is flat-packed:
: Attach the four vertical corner pillars to the bottom chamber floor using the provided 6-32 screws. The Mid-Plate
: Slide the mid-plate (which separates the PSU/lower radiator chamber from the motherboard chamber) into the designated slots on the pillars. The Top Frame
: Secure the top panel frame to the four pillars. At this stage, do not over-tighten the screws; keep them "finger-tight" until the entire skeleton is aligned to ensure the doors hang straight later. 4. Motherboard Tray & Backplate
features a removable motherboard tray, which is one of its most celebrated features. Installation : Secure your motherboard, CPU, and RAM onto the tray of the case.
: Slide the tray into the rear of the chassis. It is held in place by four knurled thumbscrews. Orientation : Depending on your version, the supports standard ATX, E-ATX, and even SSI-EEB boards. 5. Cooling & Radiator Support is famous for its massive radiator capacity.
: Supports up to a 560mm (4x140) or 480mm (4x120) radiator. Use the drop-in radiator mount for easier installation. Bottom Chamber
: Supports up to a 560mm or 480mm radiator on its side. You must install the side radiator mounts to the bottom frame first. Front/Flex-Bay
: You can mount a 240mm or 360mm radiator in the front Flex-Bays using specialized Mac-1 mounts. 6. The Flex-Bay System
The front of the case consists of "Flex-Bays." These are modular slots that can be used for: 5.25" Drives : Using the ODD bay adapters. Fan Mounts : 120mm or 140mm fan inserts. Reservoir Mounts : Specifically designed for Tube or Bay reservoirs.
To install an accessory, simply remove the blank covers and screw the accessory into the vertical rails. 7. Cable Management & Finishing Cable Pass-throughs
: Utilize the large rubber grommets on the mid-plate and motherboard tray. PSU Installation
: The power supply is located in the bottom chamber. It mounts to a removable plate. If using dual PSUs (on supported models), ensure you have the secondary mounting bracket. Panel Alignment
: Once all components are in, place the case on a level surface. Tighten all frame screws fully. Hang the hinged doors—if they don't close perfectly, slightly loosen the hinge screws, align the door, and re-tighten. 8. Maintenance Tips
: Use a microfiber cloth and a gentle, non-ammonia cleaner. The powder-coated finish is durable but can be stained by skin oils over time. Structural Checks
: Because the case is held together by screws rather than rivets, check the tightness of the frame screws every 6–12 months if you move the case frequently. or a breakdown of the screw types used for each section?
Finding an official manual for the CaseLabs Magnum SMA8 can be tricky because the original company closed in 2018 (though it has since been re-launched under new ownership).
Since CaseLabs cases were famous for their flat-pack, modular design, assembly is more like building a piece of furniture than a standard PC case. 1. Where to Find the Manual
While CaseLabs didn't always include printed manuals, they provided digital PDF guides.
Official Archive: The best place to find the original documentation is the CaseLabs SMA8 Product Page Archive or via the Wayback Machine.
Community PDF: You can often find user-uploaded PDFs on enthusiast forums like Overclock.net or r/CaseLabs on Reddit. 2. Assembly Overview & Tips
The SMA8 is held together primarily by M3 screws and 6-32 screws. If you are looking at a pile of aluminum panels, follow this general order of operations:
Step 1: The Chassis Frame: Start by connecting the bottom, front, and back frame pieces. Use the vertical corner bars to create the "cube" structure.
Step 2: Mid-Plate: Install the horizontal mid-plate. This is the structural backbone that separates the lower radiator chamber from the main motherboard chamber.
Step 3: Motherboard Tray: CaseLabs trays are usually removable. Assemble the tray and the rear I/O plate together before sliding them into the chassis frame.
Step 4: Radiator Mounts: If you are water cooling, install your radiators onto the removable "drop-in" mounts before putting the mounts into the case.
Step 5: External Panels: The side panels and top cover use a "ball and socket" snap-in system. Ensure the sockets are screwed tightly to the frame so the panels don't rattle. 3. Key Specifications for Planning
If you are using the manual to check compatibility, here are the core SMA8 stats: Form Factor: SSI-EEB, XL-ATX, E-ATX, ATX. Radiator Support: Bottom: Up to 480mm or 560mm (depending on the mount). Top: Up to 480mm or 560mm. Front: Up to 360mm. Expansion Slots: 8 slots. 4. Visual Resources
Since these cases are highly visual and complex, many builders find video guides more helpful than the text manual:
YouTube: Search for "CaseLabs SMA8 Build Log" or "JayzTwoCents Skunkworks Build" (he used an SMA8 and showed significant assembly detail).
Since CaseLabs ceased operations in 2018, physical printed manuals are rare, and the company website is offline. This write-up serves as a reconstruction of the standard operating procedures for the chassis based on the manufacturer's original design philosophy and community standards.
This is your best bet. The official manual was located at www.caselabs.com/manuals/SMA8_Manual.pdf.